Last Updated on June 20, 2023
Looking to upgrade from an Intel Core i3 or i5 CPU to a more powerful i7 or even i9 CPU? This post will show you how to ensure compatibility for any upgrade!
It’s not as simple as throwing in a new i7 or i9 CPU in place of your current CPU and calling it a day… You have to ensure that whichever CPU you are looking to upgrade towards is compatible with your current PC build which is exactly what this post is about – ensuring compatibility and upgrading the right way!
Odds are, if you’re looking to upgrade, then your CPU is from an older generation… If that’s the case, then there are more steps involved in upgrading to an i7 or i9 when you’re upgrading to a newer generation processor.
By following everything in this post, you should be able to ensure compatibility with the right parts and have a CPU upgrade that’s worthy of your PC rig.
Ensuring Compatibility With An Intel Upgrade
Even if you know which CPU you are going to upgrade to – you need to be absolutely certain whether or not your current hardware is going to be compatible with an upgrade.
Unfortunately, when upgrading from an older generation Intel CPU, such as Skylake, then you will not be able to upgrade to the newest generation of CPUs without first replacing your motherboard.
For even older generations, you’ll likely end up having to replace your RAM as well. DDR3 memory isn’t compatible with newer-gen processors which require motherboards that are no longer compatible with DDR3 RAM.
So, let’s dive into everything you need to know when it comes to compatibility with your next CPU upgrade – starting with socket types.
Checking Your CPU’s Generation & Socket Type
Upgrading from an i3 or i5 to an i7 or i9 isn’t a generalization for every processor out there. Different generations of CPUs require a different socket type motherboard in order to be utilized.
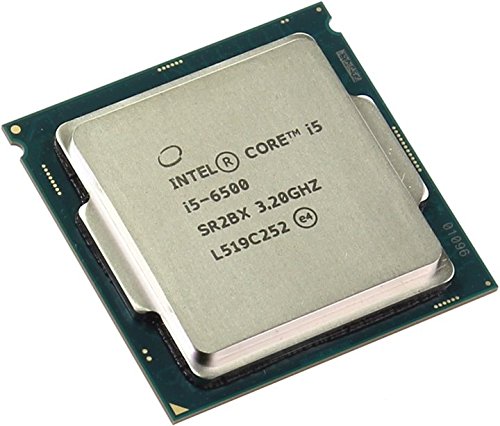
You’ll be able to tell which generation of processor you currently have by the name of your CPU. For example, the Intel Core i5-6500 is from the 6th generation.
All of Intel’s Core CPUs are named this way – Intel Core i5-7500 = 7th gen, Intel Core i3-8100 = 8th gen, and so on.
To find out which CPU you have in your PC follow these steps:
- Click on the Windows Start button in the bottom-left of your taskbar
- Type “About” then and hit the Enter key
- Look under “Device specifications” where your processor is listed
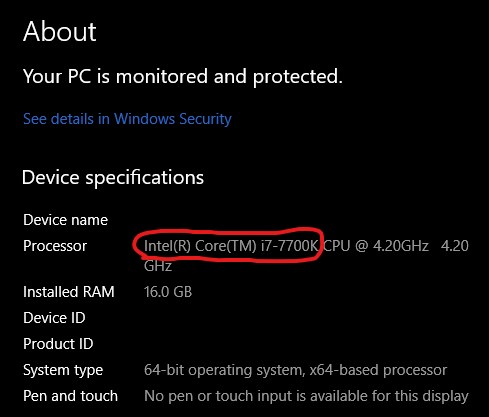
This PC uses an i7-7700K, so it’s a 7th-generation Kaby Lake CPU that is compatible with LGA 1151 socket motherboards.
From this menu, you’ll be able to see which CPU you are currently using. This is important to know because you’ll know which socket your motherboard uses from the generation of your CPU.
Most of you are likely upgrading anywhere from the 6th-9th generation of CPUs. These are Skylake (6th gen), Kaby Lake (7th gen), and Coffee Lake (8th & 9th gen) CPUs.
Different generations of CPUs use different socket-type motherboards, and you’ll need to ensure that your motherboard is either compatible with the jump to i7 or i9 or if you’ll need to replace your motherboard to have the compatible socket for a different generation of CPU.
Motherboard Compatibility
Without the right motherboard, you might not be able to upgrade to newer generations of Intel CPUs.
But it’s more than just having the right socket type with your motherboard – you also need to consider what you’re upgrading to and whether or not you plan on overclocking which will help you narrow down which type of motherboard is best to get when going to an i7 or i9 CPU.
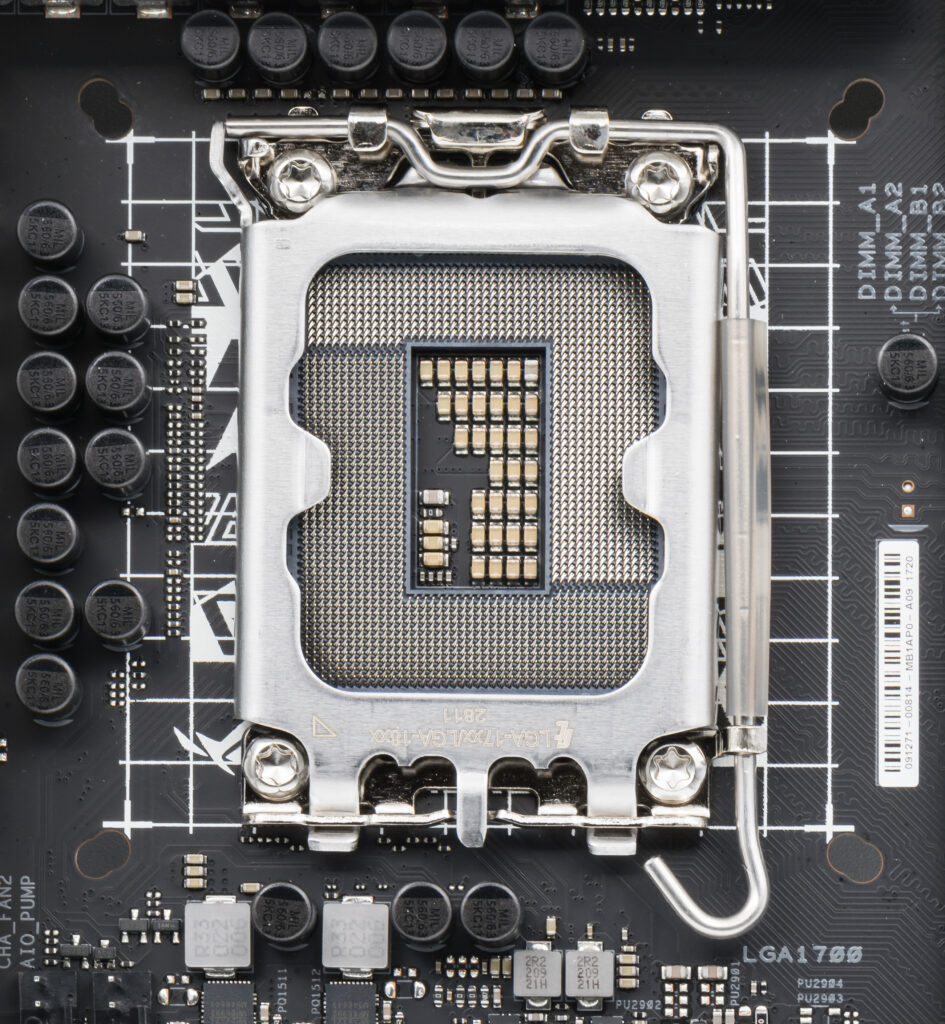
Intel CPU generations 6-9 use an LGA 1151 socket motherboard.
When you’re upgrading to a Comet Lake (10th gen) or Rocket Lake (11th gen) CPU, you’ll need a motherboard that has an LGA 1200 socket.
When you’re upgrading to an Alder Lake (12th gen) or a Raptor Lake (13th gen) CPU, you’ll need a motherboard that has an LGA 1700 socket.
If you are upgrading from the same generation or the next step up in that generation then you will be able to upgrade to an i7 or i9 using your current motherboard.
For example, if you are currently using an Intel Core i3-10100F processor, you’ll be able to jump to something like an i7-11700 without any issues (assuming that your BIOS is fully updated).
But if you’re wanting to go from an Intel Core i3-10100F to a 12th-gen or 13th-gen processor then you will need to get a motherboard that uses the LGA 1700 socket.
However, it may or may not be worth it depending on your current motherboard and use case for an upgrade.
If you’re making the jump from an i3 or i5 processor to an i7 or i9, it isn’t worth doing if you’re getting the “K” versions of those CPUs which opens it up for overclocking – not without having a proper motherboard that is able to overclock the CPU.
Intel has versions of i7 CPUs and i9 CPUs that can be used with something like an H510 board, where you aren’t able to overclock but still able to utilize a newer CPU to upgrade to.
“Z” model motherboards, such as a Z590 board, are the types of boards to use when you want to overclock the K versions of different Intel CPUs.
If you’ve got such a motherboard, then you will be able to upgrade from an i3 or i5 to an i7 or i9 within that same generation. You can also go the next generation up in the case of going from Comet Lake to Rocket Lake CPUs, or from Alder Lake to Raptor Lake CPUs.
It seems that Intel is going to continue this trend where a certain socket type is only going to be compatible for a couple of generations, and then move on to a new socket after every couple of generations.
If you’re upgrading from a much older generation then you’ll need to swap out your motherboard… But you may also need to get new RAM as well – it just depends on what type of RAM and whether or not it’s going to be compatible with the jump to i7 or i9.
Now let’s look into what type of RAM is going to be compatible with an upgrade, and what type of RAM won’t be.
RAM Compatibility
Compatibility with your current RAM will really only be an issue if you’re upgrading from a much older generation of processor because it could mean that you currently have DDR3 RAM or RAM that is running under 3200 Mhz.
From the Kaby Lake 7th generation of CPUs and on, DDR3 RAM is not compatible. So, if you’re upgrading from older generations and you currently have DDR3 RAM then you’ll also need to upgrade to DDR4 RAM.
But you aren’t going to be able to just get any DDR4 sticks, because from the 11th-gen processors and on, they will only support DDR4-3200 memory.
With that said, regardless of which CPU you’re upgrading to, you’ll want to at least have DDR4-3200 RAM to have somewhat room for “future-proofing” with newer generations.
If you don’t know what type of RAM you have in your PC then you can check it by going into Task Manager and clicking on the Performance tab.
From this tab, you’ll be able to see how much RAM you have in your PC and the speed of your RAM.
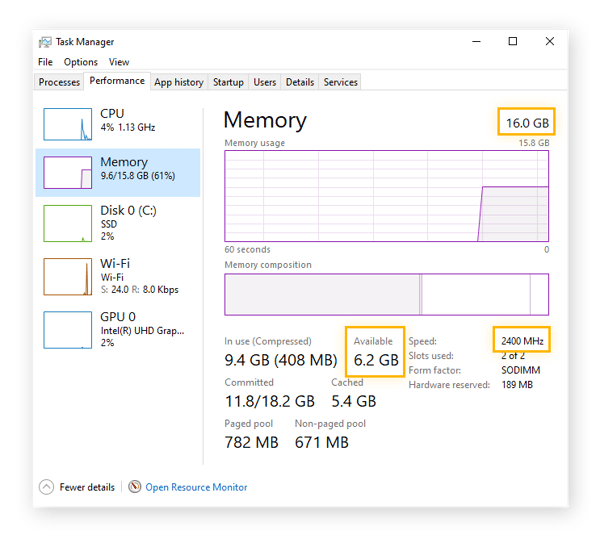
Image credit: AVG
From the example image above, you can see that the RAM speed is 2400 MHz. This RAM speed is not going to be compatible with all of the newer generations of Intel CPUs.
Since faster RAM speeds have basically become the industry standard these days, it’s not hard to find a good deal on DDR4-3200 RAM. You could either go with a 16GB or 32GB kit, depending on your budget and how much of a RAM upgrade you’re wanting to have.
Obviously, the more the merrier when it comes to RAM – but there’s no reason to go overkill. How much RAM you need with your PC will come down to what type of work you’re doing with your PC.
Avoiding GPU Bottlenecks
When upgrading your CPU you will also want to avoid having huge bottlenecking issues with your GPU’s performance.
Overall performance will bottleneck and not perform at the level that it should if your CPU is not powerful enough for your GPU and vice versa.
By ensuring that your GPU won’t bottleneck, you’ll need to understand the performance level behind your CPU upgrade.
It’s actually not a bad thing to be “bottlenecking” from your higher-performance CPU because then you can have a clear understanding that your GPU is being used to its full potential. It helps you determine if it’s also time for a GPU upgrade.
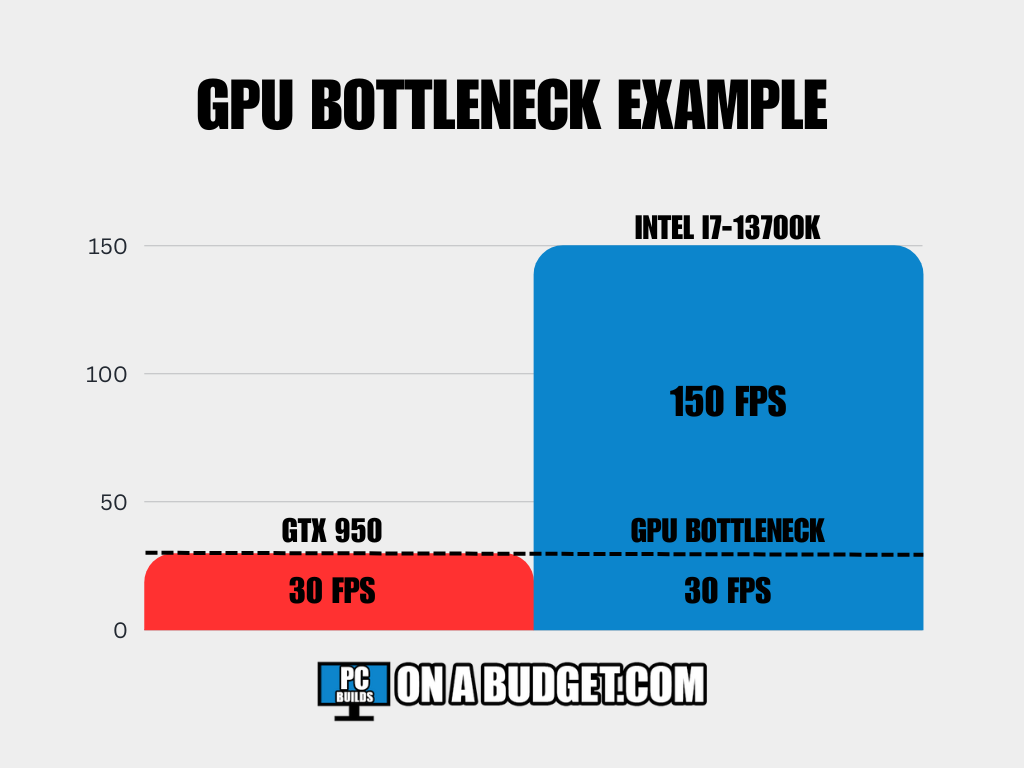
This isn’t for a specific game, more just an overall example.
That’s why you’ll see GPU performance videos using extremely powerful CPUs for any sort of GPU – it’s to ensure that the GPU is being used to its true potential.
You never want your GPU to be too much more powerful than your CPU… Because that’s where you’ll start seeing bottlenecking issues and having to do more adjustments to compensate for the performance drop.
You can take a look at CPU or GPU usage while playing any game with a program like MSI Afterburner if you want to measure it specifically.
If you see high CPU usage and low GPU usage in-game, you’ve got a CPU bottlenecking issue and it’s also likely that the game is more CPU intensive.
The same goes for super high GPU usage and low CPU usage – that’d mean you’ve got a GPU bottleneck going on and that the game likely needs to use more GPU juice.
You can always adjust game settings accordingly to try and balance out CPU/GPU usage but in general, you should be using components that compliment each other on performance rather than having something that bottlenecks the other.
While upgrading to a new CPU, odds are that you won’t have to worry about bottlenecking since you’ll either have your GPU working to its full potential or you’ll understand that it’s time to also go for a GPU upgrade.
Should You Upgrade To A 12th or 13th Gen CPU?
If you’re upgrading an i3 to an i5 or an i7 to an i9 then your only choice is to go with the latest generation and have the best of the best… right?
Well, that depends on your specific use case and whether or not you need to upgrade to a newer generation for other purposes other than strictly getting better performance in your gameplay.
Would the power per dollar spent make sense to upgrade to a newer generation?
Which generation(s) are compatible with your current PC?
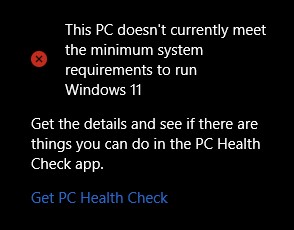
Is your current generation of CPU able to upgrade to Windows 11?
These are great questions to ask yourself before immediately upgrading to the newest generation of Intel CPU. If your current CPU is many years old then it absolutely makes sense to upgrade everything and move to the newest generation.
Sometimes, it might be better to just upgrade your CPU and stay with your current board to save money.
But what if you’re currently using an i3-10100F and want to continue using the same motherboard with an i5 upgrade?
For that situation specifically, it would make the most sense to jump to the 11th generation of i5 since the LGA 1200 socket type is used for both of those generations and jumping up to the next generation to an i5 or an i7 would provide a huge performance boost!
For the most part, the pricing of say an i5-10600K and an i5-11600K are going to basically be the exact same price so it becomes a scenario of “why not?” for the upgrade.
You’ll need to shop around, compare prices of different compatible generations of CPUs to upgrade to, and go from there.
If there’s a deal on an upgrade path going one generation higher for your CPU while still being able to use your same motherboard… That might be more valuable to you than spending an arm and a leg replacing multiple parts for your CPU upgrade.
It comes down to having an optimal choice for the future of your PC and what you’ll need in terms of compatibility and what’s needed.
Ensure that the upgrade is actually worth getting by gauging how much more performance you’ll be getting.
Don’t just jump the gun, check out performance videos and see if it’s worth doing first.
Old Gen CPUs vs. New Gen CPUs
Keep in mind, that if you’re upgrading from a much older generation such as the 7th generation of Intel Core CPUs then do note that only the 8th generation and up are going to be compatible with an upgrade to Windows 11.
There are some exceptions for specific CPUs – check the list of supported Intel CPUs here so that you can be certain that the CPU is compatible.
Windows 10 support and security updates end in 2025. Older generation CPUs do not have the capabilities to upgrade to the new Windows 11 operating system, and it’s important to have Windows updates for security purposes and to have better overall performance.
It’s unfortunate how many motherboard replacements are needed jumping between generations, especially when it comes to the newer generations, but it’s impossible to do any upgrading without fully replacing your board (and likely RAM) for compatibility.
The main reason for bringing up Windows 11 compatibility for different generations is the same reason for knowing what’s worth upgrading to and what isn’t.
Sometimes, the performance boost by simply upgrading your current generation of CPU is enough and will stand the test of time – and you’re saving money on top of it.
How To Choose Between i3/i5/i7/i9
Once you understand everything you need for compatibility then it’s time to choose which type of CPU to upgrade to.
In general, if you’re upgrading your CPU strictly for better game performance then you will want to look into upgrading to a newer generation i3 or i5 CPU.
If you’re upgrading your CPU for better performance on production workloads such as rendering, editing, CPU encoding, and/or using your PC for 3D workstation use then you’ll want to look into getting an i7 or i9 CPU.
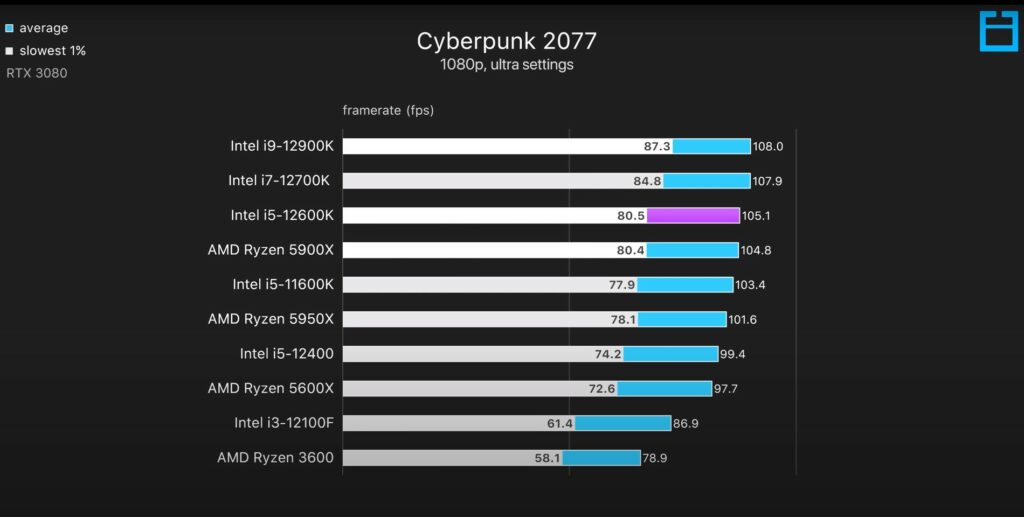
Image credit: Optimum Tech
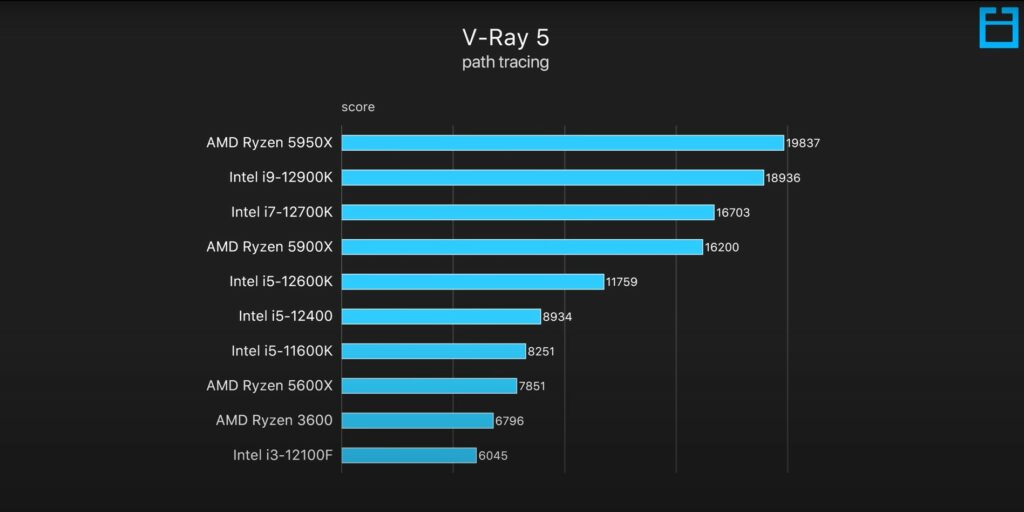
Image Credit: Optimum Tech
When you compare raw gaming performance with the newest generation between an i3, i5, i7, and i9 CPU then you’ll see that when it comes to power per dollar spent, it doesn’t make sense to shell out on an i7 or i9 CPU.
That cost difference is better spent on getting a high-end GPU for high-quality gaming!
CPU usage in gaming is largely more for ensuring you don’t bottleneck with the GPU since the GPU handles most aspects for higher frame rates and performance in-game.
Sure, an i7 or i9 CPU is going to be faster than an i3 or i5 but faster doesn’t mean better gaming performance.
More CPU cores and threads along with higher clock speeds help tremendously with complex tasks that are dependant on CPU performance – more cores, more threads, and higher clock speeds do not mean better game performance… At least not in a meaningful way.
When you’re trying to optimize your PC’s gaming performance, it’s better to gauge the performance of your GPU and get a processor that will provide enough power for your GPU to be fully utilized.
Newer generations of an i3 or an i5 are more than enough for high-end gaming whereas a new i7 or i9 CPU’s main benefit is boosting performance with editing, streaming, and rendering.
Conclusion
Hopefully, this post has helped you narrow down how to upgrade your Intel CPU to something newer while also ensuring compatibility and maybe saving some money along the way!
It can be a bit confusing about what exactly needs to be replaced or which CPU is best for the GPU that you’re using or planning to use… So if you’d like some help with an upgrade path for your current PC and want more specifics about which CPU or motherboard to go with, feel free to ask me in the comments below – I’m more than happy to help!
If you’re at the point of wanting to build a new PC then you can also learn and get help here on the site! Click the button below, choose a budget, and hit me up in the comments for whichever build you’re interested in going with.
So, which CPU are you planning on upgrading to?
Are you upgrading for more game performance or more productivity power?
Let me know in the comments below! 😀
Hey there! 👋 I’m Colton, founder of PC Builds On A Budget.
Whether you need help putting your PC together, finding a great pre-built rig, or want some help finding awesome peripherals – I’ve got you covered!
I share my experiences of anything and everything related to gaming PCs with you here. 👍