Last Updated on November 10, 2020
In today’s post I’d like to share with you how to install Windows 10 on your PC build. By following these steps, you’ll have Windows 10 installed in no time!
After you are done building your PC, you will need to install the Windows 10 operating system in order to get everything else in order. Microsoft has made it fairly easy to install Windows 10 onto your build, but there are a few things you need to have before you install it.
You’ll also need to know about a few things after you get everything installed which is what I will be going over in this post.
What You’ll Need To Install Windows 10
There are a few things you need to make note of when before you install Windows 10 onto your fresh PC build.
Here are the things you need for installing the latest version of Windows 10:
- A blank USB drive with at least 8GB of storage space
- At least 32GB of free storage installed to your PC build
- Another PC to download the installation media to your blank USB drive
- The know-how for navigating your PC’s BIOS and changing your boot order
Creating Your Installation Media
First thing’s first, you need to have a way for your PC to be able to recieve the latest version of Windows 10.
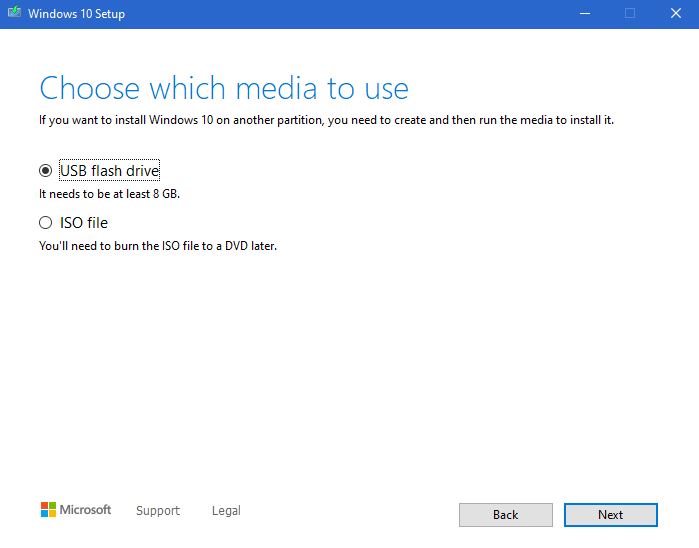
The absolute easiest way is to use another PC to download Microsoft’s Windows 10 installation media onto a blank USB drive that has 8GB of free storage space. (It has to be completely blank, otherwise it will not work.)
To download the installation media, visit Microsoft’s official download page and click on “Download tool now”.
After you download their Windows 10 setup .exe file, launch it and follow the instructions for creating installation media.
Important: Make sure you install the 64-bit version. If you don’t, you will not be able to use all of the RAM that is installed onto your build.
Choose the USB flash drive option, hit next and then the tool should work its magic to install Windows 10 onto your USB drive.
After that is done, you will need to put that flash drive into a USB slot on your PC build. You will need to change your PC’s boot order through your motherboard’s BIOS in order to fully install it.
Navigating Your Motherboard’s BIOS
When you power on your PC build you will see a brief screen that shows your motherboard’s brand. This could be ASUS, Gigabyte, ASRock, MSI etc.
During this screen, you will need to access your BIOS by pressing a specific key. Each motherboard is different, the screen will usually show you which key it is at the bottom of the screen.
This could be the Escape, F1, F2, F12, or Delete key. Figure out which key is your motherboard’s key and then reboot it if you need to in order to access the BIOS.

Once you are in your BIOS, you will need to find where to change the boot order for your build. It is usually easiest to navigate your BIOS using the arrow keys and the Enter key on your keyboard to look through the different sub-menus.
You will be able to easily find where to change your boot order within your motherboard’s manual.
Changing Boot Order
After you find out how to change the boot order, change it to the USB drive that you installed the Windows 10 installation media on.
You should be able to find it within the boot order sub-menu within the BIOS.
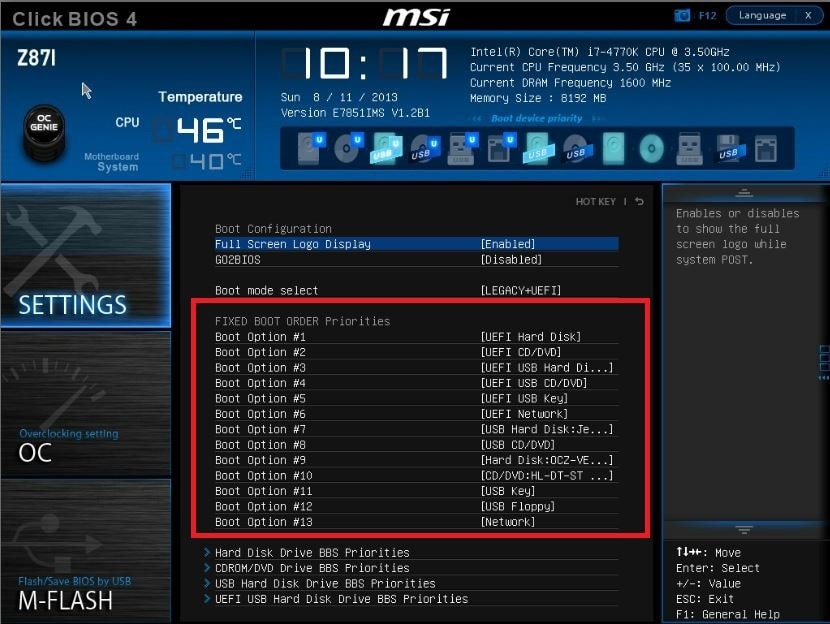
After you set the USB drive with Windows 10 installation media to boot first before anything else, you should then save your settings and reboot your PC.
If you did it right, your PC build should be booting up into a Windows 10 installation screen.
The Windows 10 Installation Process
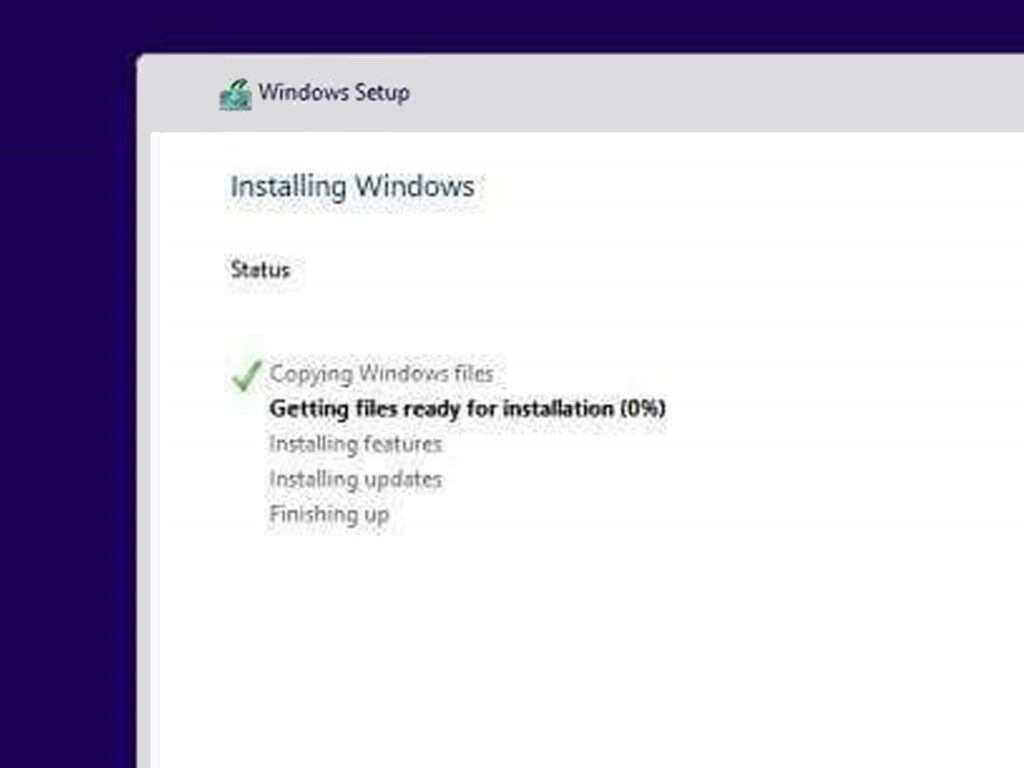
Once you’re inside of the Windows 10 installation program, you will need to follow the instructions on-screen.
Don’t click through this setup quickly simply because you want it done and over with.
There are multiple settings that you may want to turn off that are on by default.
So be sure to read through all of the different settings as you are installing Windows 10.
It will take a bit of time for Windows 10 to be fully installed onto your build, so you may want to let it do its thing and come back after a while.
After this initial setup portion is finished, you will be able to mess around and toggle a bunch of different settings including privacy settings, account features and a few others.
What To Do After Windows 10 Is Installed
After Windows 10 is fully installed, you may want to give your PC another restart to make sure everything is working properly.
You aren’t done yet, though! You will still need to download the right drivers for your PC build after Windows 10 is installed.
Your drivers are hardware specific, so I cannot tell you specifically what you will need to download. However, if you know what your hardware is, it will not be hard to find the right software.
Using Windows 10 To Find Drivers
Most of your driver software will be able to be automatically installed from Windows 10.
If there are some drivers that weren’t automatically installed then you will be able to find what you need within the Device Manager.
Click on Start, search for “Device Manager” and open up that window. From this list, you will be able to right-click any part of your PC that requires the right drivers.
Windows 10 is pretty good at finding the right drivers for you, but you might have to find some of them manually.
Video Card Drivers
If you are using an AMD video card, you will be able to find the right software on their official AMD driver software page – navigate through and find your exact video card and you will be able to find it in a breeze.
If you are using a card from Nvidia, you will go through a similar process through their official Nvidia driver software page – find your exact card and follow the instructions.
Anti-Virus Programs
Most of you will probably be happy with Windows 10 Defender as your primary anti-virus and that’s great – it comes pre-installed with Windows 10 and many folks are more than happy with it.
However, before you get into downloading a bunch of other programs and games, you will need to make sure that it’s configured or at the least make sure that you are using an anti-virus that you like.
Me personally, I use Avast! Anti-Virus because I have used it for many years without failure. They give pop-ups whenever a threat is detected and they’re able to eliminate any threat very quickly.
Gaming Programs
Last and obviously not least, you will need to download your games and the programs that go with them.
Almost all of us are going to be using Steam as our primary library for gaming. But there are some other programs that you might want to dive into as well, so after everything is installed (drivers, etc) then now is the time to get the games going.
Downloading programs for your games should be the last bit of installations that you do.
After this, your PC build is absolutely ready to go!
To Conclude
I hope that this post has helped you in figuring out how to install Windows 10 onto your PC build.
If you have any questions at all about installing certain drivers, programs or Windows 10 as a whole, feel free to reach out to me!
What programs are essential for your PC build?
Did you go with Microsoft’s default anti-virus, or are you using something else?
Let me know in the comments below! 😀
Hey there! 👋 I’m Colton, founder of PC Builds On A Budget.
Whether you need help putting your PC together, finding a great pre-built rig, or want some help finding awesome peripherals – I’ve got you covered!
I share my experiences of anything and everything related to gaming PCs with you here. 👍