Last Updated on January 21, 2024
If you’re getting ready to build a new PC, you’ll need to know how to get the latest version of the Windows OS running on it. I’m here to guide you through installing Windows 11, ensuring you start on the right foot!
Windows 11’s system requirements will be the first checkpoint. I’ll help you understand what’s needed to ensure your PC build meets the specs required to install Windows 11.
Then you’ll be able to ensure you have everything you need as I’ll outline what all you need to install the OS to a new build.
Installing Windows 11 on your new PC brings a bunch of benefits, integrating the latest features, enhanced security measures, and a user-friendly interface designed for productivity and entertainment.
From a fresh aesthetic to innovative multitasking tools, the latest updates from Microsoft with Windows 11 have made it worth installing on a new build.
Before proceeding, you’ll need to gather a few things.
Let’s make sure you have a valid Windows 11 license, a USB flash drive with at least 8 GB of storage for the installation media, and a stable internet connection. I’ll also provide a comprehensive checklist, covering both hardware and software requirements.
Lastly, I’ll outline the installation process to help you get things rockin’ and rollin’ when you go to boot up your PC. This will include preparing the installation media, booting from this media, and following the prompts to set up Windows 11 on your build. After this, we’ll get into what to do after everything is set up.
Preparing Your New PC Build for Windows 11
Before we proceed with the actual installation of Windows 11, it’s crucial to ensure your new PC is ready for the OS.
This stage is all about laying the foundation for a smooth installation process.
I’ll guide you through ensuring your PC builds specs are ready for Windows 11, updating your PC’s basic input/output system (BIOS), creating installation media, and configuring your machine to boot from this media.
For a quick rundown, here’s everything you need to install Windows 11:
- A blank USB drive with at least 8GB of space
- At least 64GB or more storage space installed on your PC
- Another PC to download the installation media to your blank USB drive
- The know-how for navigating your PC’s BIOS and setting your boot order (this is covered in this post)
Once you’ve got everything you need, ensure that your PC is going to be able to have Windows 11 installed in the first place by double-checking that your CPU is compatible with Windows 11.
Microsoft has listed all of the compatible CPUs with separate charts for Intel CPUs and AMD CPUs at these links:
- Intel CPUs: Windows 11 supported Intel processors
- AMD CPUs: Windows 11 supported AMD processors
In a nutshell, you’ll need at least an 8th-gen Intel CPU or a Ryzen 3000 series AMD CPU to be able to install Windows 11. Otherwise, you’ll need to install Windows 10.
With today’s market and pricing, you’re likely using the newer generations of parts for a new PC and it will be compatible. If you’re still looking for a motherboard for your PC, we have a motherboard selection guide here on the site that will help you find a good one.
After understanding if your PC is compatible with Windows 11, the next step is ensuring your PC’s BIOS is up-to-date.
An up-to-date BIOS ensures that your motherboard and ultimately your PC as a whole will work optimally with Windows 11.
To update your BIOS, you’ll need to visit your motherboard manufacturer’s website, download the latest firmware version, and follow their specific update instructions.
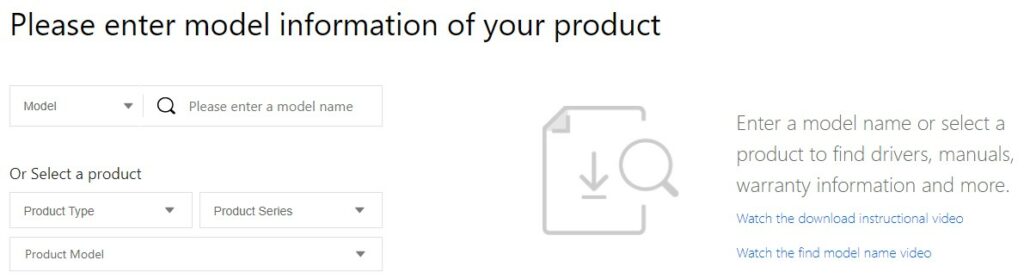
This is an example of what the search function could look like, always ensure that you’re downloading the firmware from the exact motherboard model you’re using.
If you’re buying all-new parts for your build, then your motherboard likely has the latest BIOS update pre-installed right out of the gate.
With the BIOS up to date, the next step is to create the Windows 11 installation media.
You’ll need a USB flash drive with at least 8GB of space.
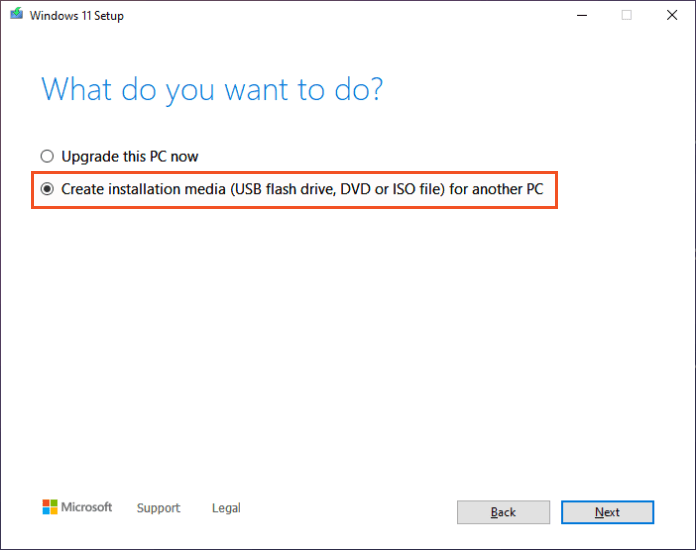
Microsoft’s Media Creation Tool makes this easy.
Download it, run the tool, and select ‘Create installation media for another PC’. Follow the prompts, and you’ll have your bootable USB drive ready in no time.
After creating a Windows 11 boot stick, you’re ready to install Windows 11.
These upcoming installation steps may seem technical, but they’re straightforward when you follow the motherboard manufacturer’s instructions.
If at any point you feel stuck, remember that online resources and the motherboard’s manual can be invaluable sources of information.
There are plenty of videos that show how to navigate for many specific motherboards if you need to see exactly where to do this for your motherboard.
With your PC prepared, you have laid the groundwork for a smooth Windows 11 installation. In the next section, we’ll get into installing the OS itself.
I’ll walk you through from booting up from the installation media to the exciting moment when you see the Windows 11 desktop for the first time. 👍
Step-by-Step Guide to Installing Windows 11
So, you’ve prepped your new PC and crafted your Windows 11 installation media. Now it’s time to actually install Windows 11!
Here’s how you do it, step by step:
First, make sure your PC is turned off.
Insert your installation media, whether it’s a USB flash drive or a DVD, and then turn on your PC.
Press the key that opens the BIOS for your PC, like F2, F10, F12, or Esc.
Select your designated installation media as the first #1 boot device from the boot-device priority menu.

Note that every motherboard’s BIOS boot order settings look different and navigate differently.
Follow your motherboard manufacturer’s manual or a video if you get stuck with navigating your particular motherboard’s BIOS.
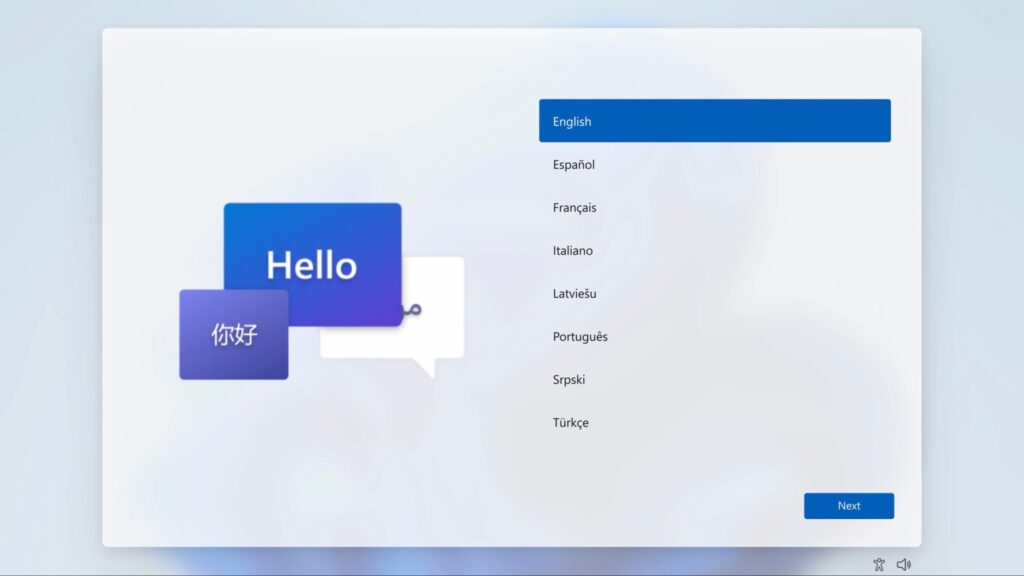
Once your PC boots from the installation media, you’ll be greeted by the Windows Setup screen.
Here’s where you select your language, time, currency format, and keyboard or input method. Click ‘Next’ to continue.
Now, hit ‘Install Now’. You’ll be prompted to enter your product key for Windows 11.
If you don’t have one yet, you can skip this step and enter it later, but remember, you will need a valid product key to activate Windows.
(There are plenty of legitimate key sites you could use to save money on a valid license)
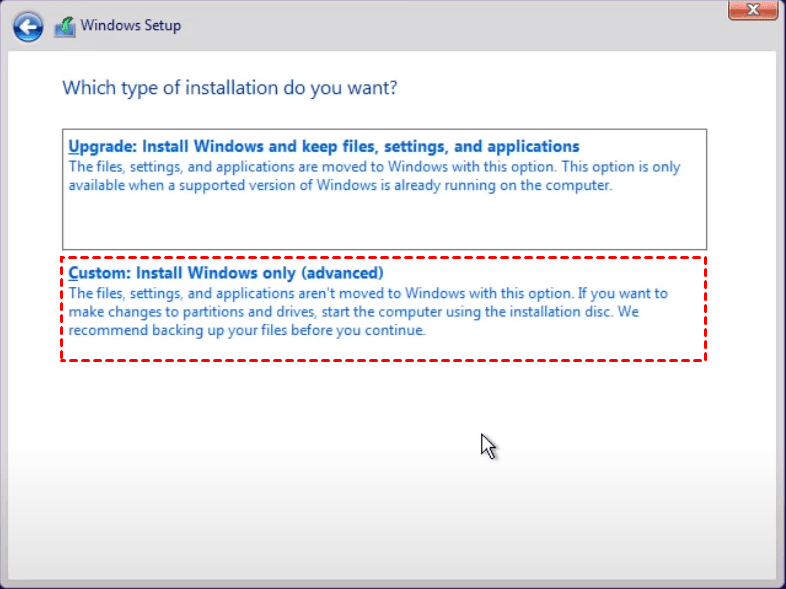
Next, you’ll choose the installation type.
If you’re installing Windows 11 for the first time, select ‘Custom: Install Windows only (advanced)’.
On the partition screen, if your PC’s hard drive is brand new and unformatted, you’ll need to create a new partition.
Select ‘Drive 0 Unallocated Space’ and click ‘New’. Windows will partition and format the drive for you.
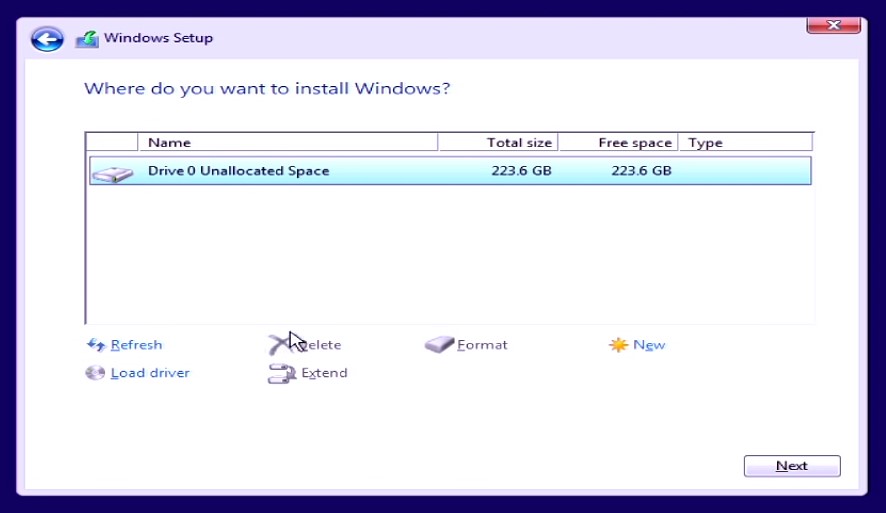
After partitioning, make sure the primary partition is selected, then click ‘Next’. Windows 11 will now begin installing. Your PC will restart a few times during this process.
Don’t remove the installation media until prompted.
Once the installation is complete, it’s crucial not to overlook post-installation tasks to ensure your PC is running smoothly.
This leads us right into the next segment: customizing and securing your fresh OS.
Post-Installation Setup and Customization
Once Windows 11 is up and running on your new build, it’s important to take a few final steps to ensure everything is fine-tuned and secure.
I’ll guide you through the post-installation process, making sure your PC is fully operational and altered to your preferences.
First things first, you’ll want to complete the initial setup.
This involves choosing your region, signing in with your Microsoft account, and deciding on your privacy settings.
TAKE NOTE of these choices, as they can affect your overall user experience.
Next on your list should be driver installation. This goes beyond basic functionality; it’s about getting the most out of your hardware.
Windows 11 should automatically find virtually every essential driver for your build, but there are times when this is not the case.
If Windows 11 for some reason doesn’t automatically update your essential drivers, you’ll be able to navigate to the ‘Device Manager’ to update any driver.
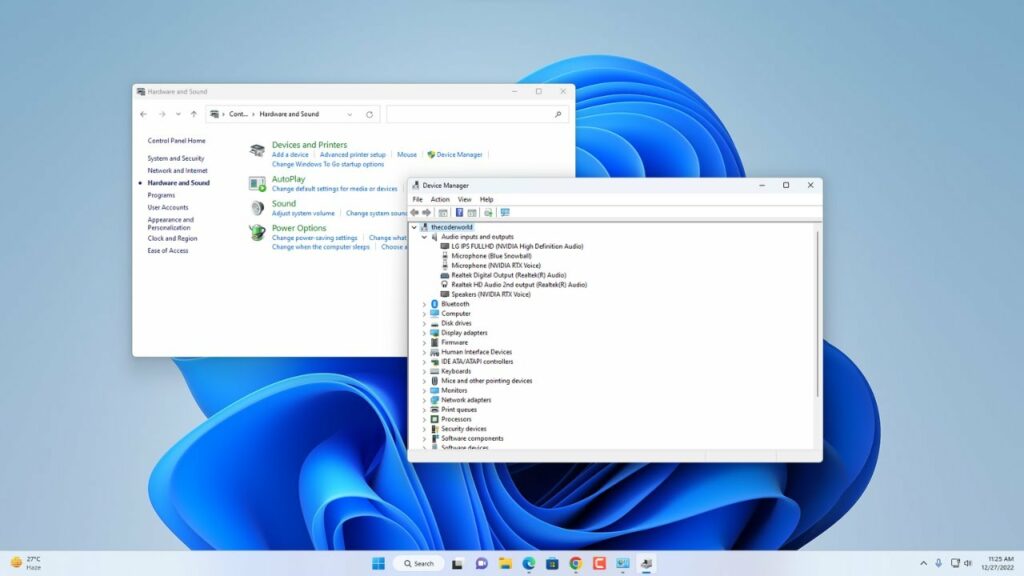
If you’ve got Windows 11 fully updated and it hasn’t automatically updated your PC’s drivers then you’ll need to visit the websites of your component manufacturers to download the latest drivers.
Pay extra attention to your graphics card, motherboard, and network adapters.
Your graphics card driver will likely be the only driver that you will need to manually install.
If you are using an AMD video card, you will be able to find the right software on their official AMD driver software page – navigate through, find your exact GPU, and install the software to update your video card drivers.
If you are using a card from Nvidia, you will go through a similar process through their official Nvidia driver software page – find your exact card and follow the instructions.
AMD’s Adrenaline or Nvidia’s GeForce Experience software both automatically install and automatically update your video card drivers with ease.
Without the correct software for your card, you aren’t going to be able to run any games and you’ll run into a lot of funky visuals while using your PC – you’ll need to install the correct video card software right away.
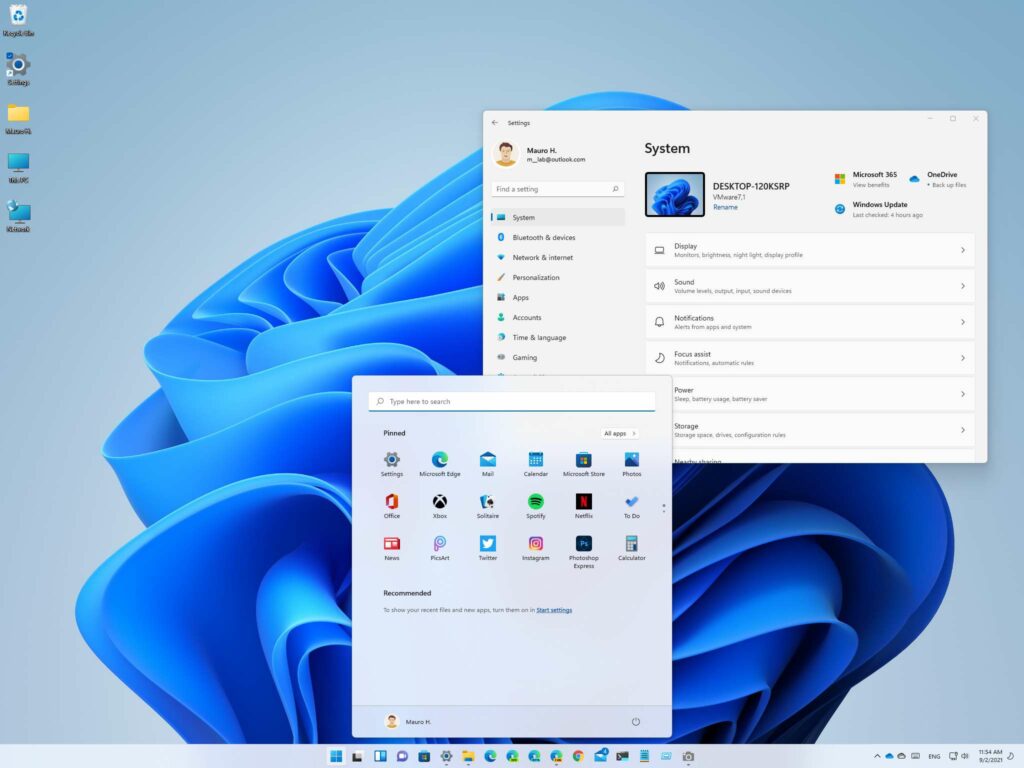
After installing your video card’s software and updating the GPU drivers, it’s time to customize Windows 11 to your liking.
Go through the system settings and adjust the start menu, taskbar, and notification settings. Discover the themes and personalize your desktop to make your space truly yours.
DON’T FORGET security. Your new system needs to be protected from the start.
Activate Windows Defender and check for updates immediately. Consider setting up a recovery drive at this point—it’s your safety net.
I’ve always used Avast! for my PC’s security, but anti-virus/PC security software comes down to personal taste. Windows Defender does a fine job of keeping your PC secure.
Take your time and explore the features that are new to Windows 11.
Familiarize yourself with the updated interface, the new Microsoft Store, and improved multitasking capabilities with Snap Layouts and Virtual Desktops.
Lastly, after the essentials are in order, get your gaming program(s) installed!
99.9% of us use Steam as the go-to source for our games, but you may also need other game launchers installed depending on which games you want to start out playing.
Conclusion
By following these steps, your new PC will not only perform well but will also reflect your personal work style and preferences! Regular maintenance and updates will keep it running smoothly for years to come.
Hopefully, this short guide helped smooth out the process of getting Windows 11 installed on your new PC build. I didn’t want to go super in-depth here – just wanted to share a quick guide to follow when you’ve got your PC put together and ready to get booted up quickly.
If you’d like me to go more in-depth on different topics with Windows 11, such as the features, different customization options, security, or anything else in between – let me know and I’ll see what I can do!
So, have you got Windows 11 installed on your new build?
How do you have Windows 11 set up with your build?
What are your preferences for the Windows 11 UI?
Let me know in the comments below! 😀
Hey there! 👋 I’m Colton, founder of PC Builds On A Budget.
Whether you need help putting your PC together, finding a great pre-built rig, or want some help finding awesome peripherals – I’ve got you covered!
I share my experiences of anything and everything related to gaming PCs with you here. 👍