Last Updated on January 8, 2024
Choosing the right motherboard for your PC build can be quite confusing at first.
How do you know which motherboard is compatible with the rest of your PC build’s components?
What should you look for in a motherboard?
What are the most important parts of a motherboard for your specific rig?
From all of the different slots on a board, the difference between form factors, ensuring compatibility with your CPU choice, to the most important types of expansion for future upgrades – this article aims to help you understand how to choose the right motherboard for your PC build and to guide you through understanding what to look for when choosing a compatible board for your rig.

Understanding the Core of Your PC: Choosing a Motherboard
Beyond just being a circuit board, the motherboard is the central hub responsible for facilitating communication between all of your PC’s components.
The motherboard acts as a central platform to which other essential components are connected. These components include the CPU (Central Processing Unit), RAM (Random Access Memory), storage devices (HDDs and SSDs), graphics cards, USB devices, and other expansions.
The motherboard is responsible for the data communication between all of these different components of your PC. This communication is facilitated by the motherboard’s chipset, which manages that data flow.
The chipset is labeled as a way to tell which type of motherboard is going to be compatible with the CPU that you use or plan on using for your PC build – we’ll go over compatibility basics in the next section.
As you explore all of the different brands for the perfect motherboard for your rig, several factors come into play. Although a motherboard doesn’t affect gaming performance in a meaningful way – it certainly determines what you can and cannot do/upgrade for the future of your build.
Compatibility, form factor, expansion capabilities, and future-proofing…
All important factors to keep in mind when choosing any motherboard.
So let’s dive into each of these aspects to better understand what to look for when selecting a motherboard that is best for your build.
Motherboard & CPU Compatibility Basics
One of the most confusing parts of building a PC is ensuring full compatibility with whichever processor you end up wanting to use.
But it goes beyond just ensuring that the board is the correct socket type or chipset of your board for your CPU – some boards are better suited for specific CPUs that are meant to be overclocked, or sometimes you’ll think that the lowest-cost motherboard is going to stand the test of time when in reality… It ends up making your PC crash and act out of wack.
Motherboards sure have come a long way and it’s easier than ever to confirm compatibility with any board of your choosing through different labels and tools that you can look at/use.
Let’s talk about socket types and chipsets – specifically how to have a 100% win rate when it comes to full compatibility with your build.
CPU Socket Types & Chipsets
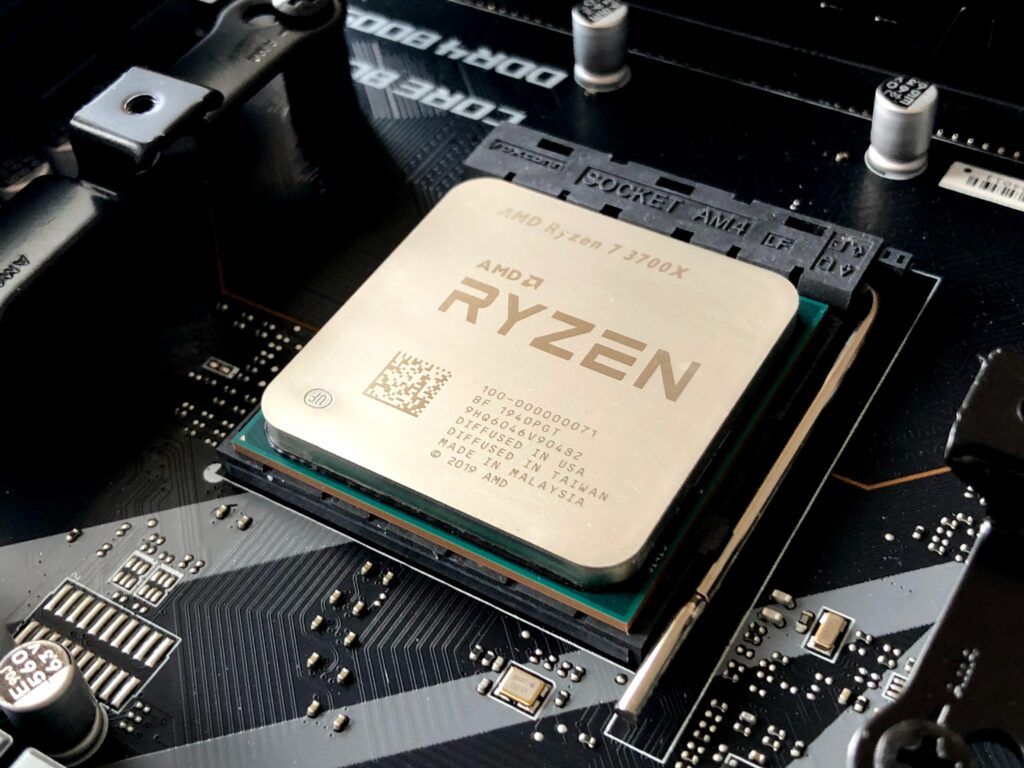
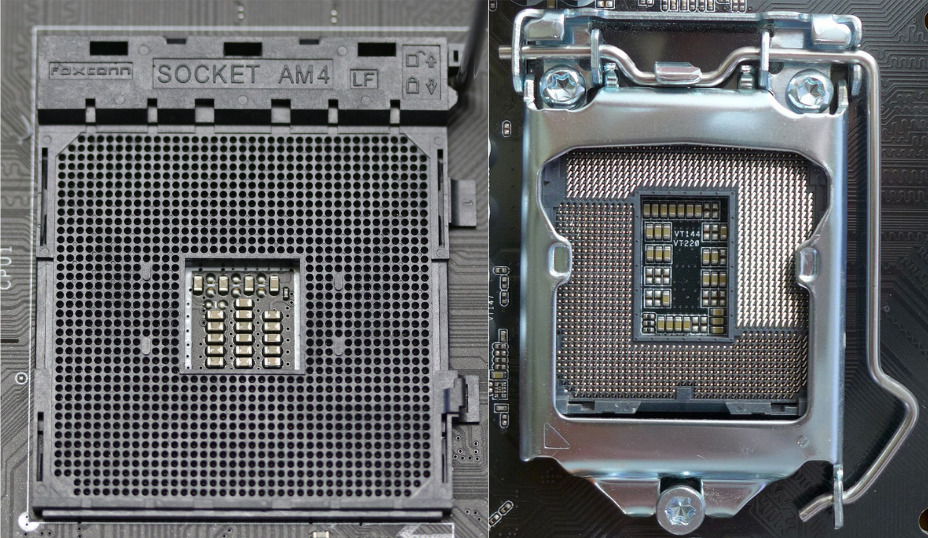
Consider the processor socket type – Intel and AMD have different architectures.
Always ensure your chosen motherboard supports the latest CPUs from your preferred manufacturer.
Understanding how to recognize compatibility with your CPU will ensure that you avoid any sort of compatibility issues while considering different types of boards/brands.
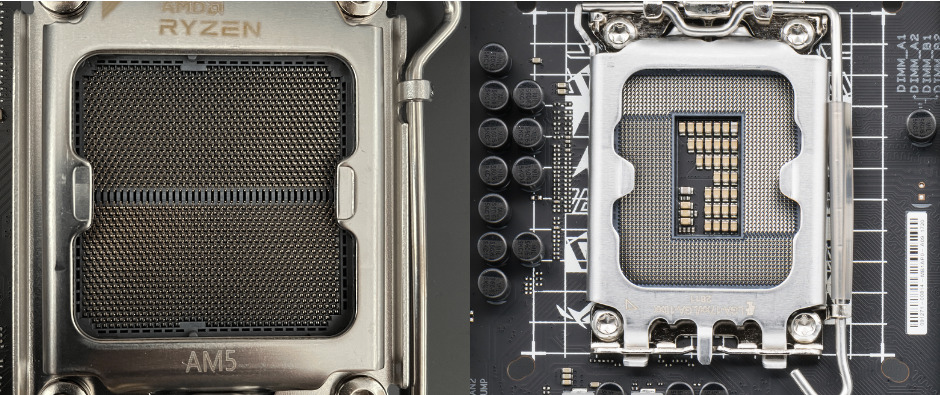
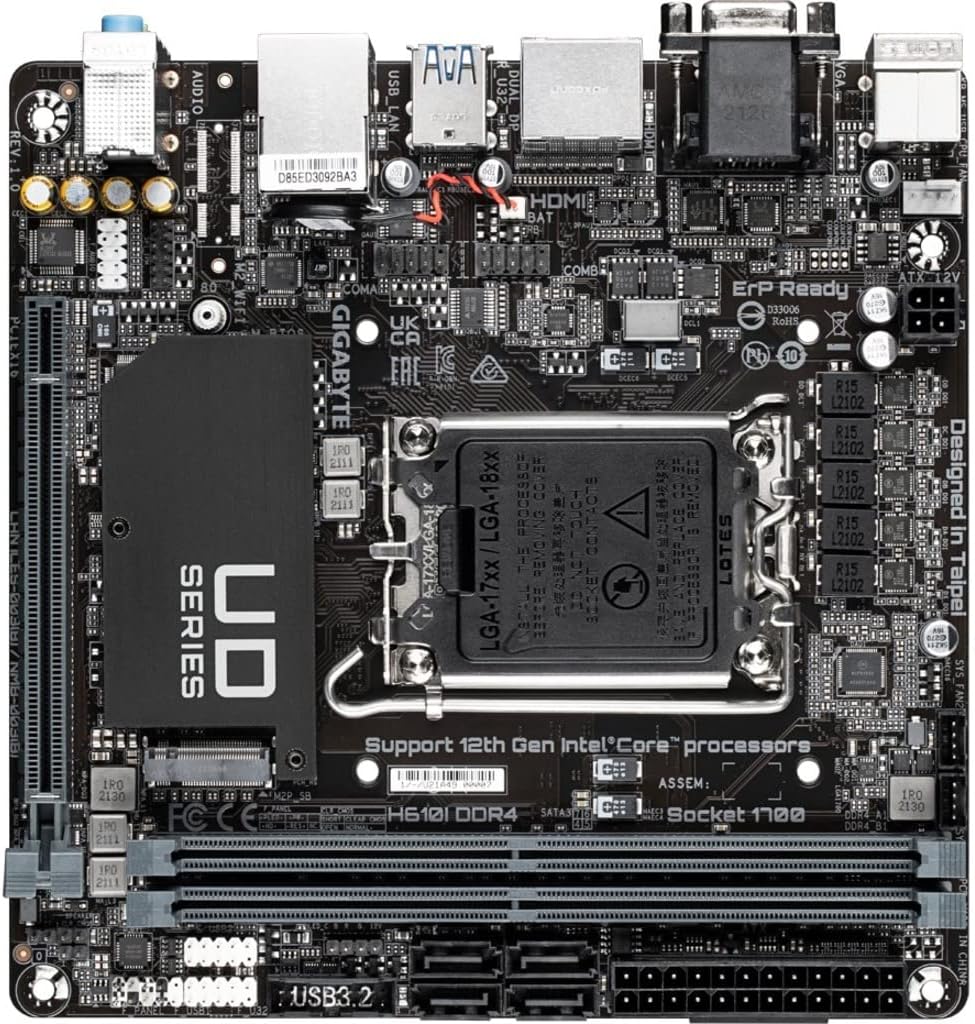
The CPU socket is the mechanical component that provides electrical connections between the motherboard and the CPU. It is the center slot on the motherboard where the CPU is installed.
A chipset is a set of incorporated circuits on a PC’s motherboard that handles the data stream between all of the different pieces of hardware in your PC.
Different CPUs come in different shapes and configurations, and manufacturers design motherboards to accommodate specific CPU socket types.
Ensuring compatibility between the CPU and the motherboard socket is crucial for the CPU to function.
There’s no “wiggle room” when it comes to matching up the socket type with whichever CPU you’re planning on using for your build. Incompatible socket types simply aren’t going to work with different CPUs.
Intel and AMD are the two big CPU makers that require these different socket types from different motherboard manufacturers.
Socket Type Examples:
- Intel: LGA (Land Grid Array) sockets, such as LGA 1200 and LGA 1700
- AMD: PGA (Pin Grid Array) sockets, such as AM4 and AM5
Chipset Examples:
- Intel: Common chipsets include H series (e.g., H510, H610), B series (e.g., B560, B660), and Z series (e.g., Z590, Z690)
- AMD: Common chipsets include B series (e.g., B550, B650), A series (e.g., A520, A620), and X series (e.g., X570, X670)
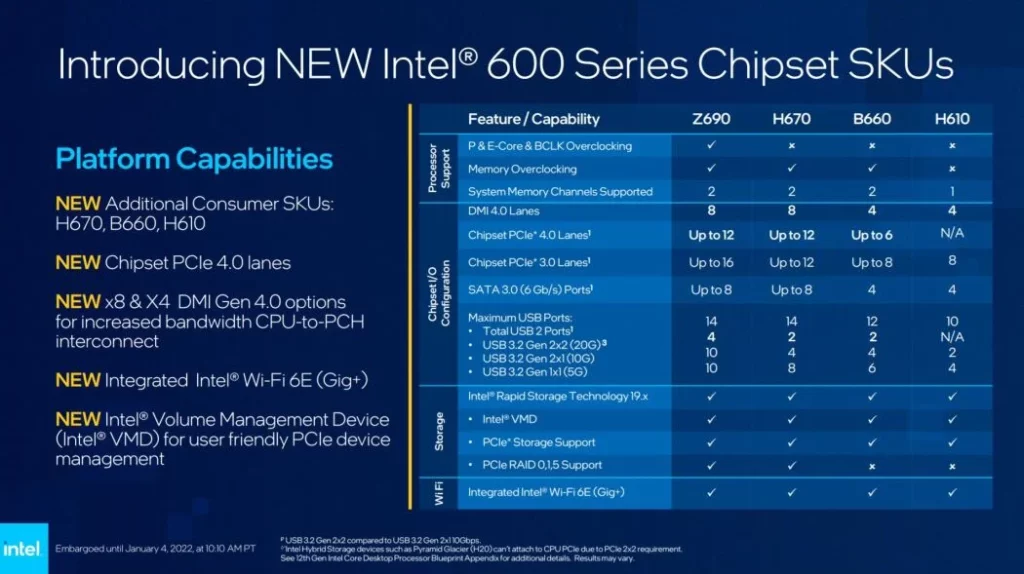
This is where different chipsets come into play – a motherboard is designed for specific socket types and goes off of different types of chipsets which determines what your board is essentially able to do.
Different chipsets support different generations of CPUs based on whichever socket type is used with the CPU.
Chipsets impact the overall utility of the motherboard.
They determine the number and types of ports, supported storage types, USB standards, networking capabilities, and other features.
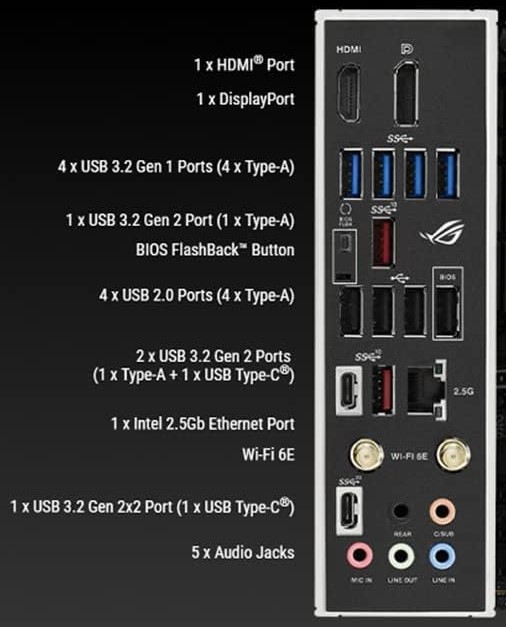
The features of a chipset can significantly impact the overall capabilities of a motherboard and, by extension, the entire PC build.
This depends on the type of expansions you wish to use with your build or what I/O connections you have with your board – it’s all determined by the chipset.
Ensuring Compatibility
The labeling of the CPU socket type makes it simple to confirm compatibility, all you have to do is ensure that the CPU socket type matches the socket on the motherboard.
For instance, an LGA 1700 CPU, such as the Intel Core i5-13400F, will only fit in a motherboard with an LGA 1700 socket, like the Intel 600 series or 700 series chipset-based motherboards. You’ll need to keep this in mind especially if you ever need to upgrade your Intel CPU to any other generation or model.
The latest releases seem to have less and less compatibility for older generation CPUs, so it’s more common to need a newer specific type of board for whatever your preferred CPU is for your build.
You can refer to AMD or Intel’s compatibility tools to confirm compatibility with specific motherboards:
From AMD’s compatibility tool, you can sort by the CPU (AM4, AM5) and it will list all of the compatible motherboards which you can refer to if you have a specific motherboard in mind, you can also search for any specific board.
From Intel’s compatibility tool, you can type in whichever CPU you’re using or plan on using and it will sort out all of the compatible motherboards that you can use with that CPU.
You should also check the motherboard’s specs to confirm that it supports the specific generation of CPU you intend to use. Newer CPUs may require a BIOS update for compatibility.
You’ll be able to tell on the box of a motherboard if it’s going to be compatible with a newer generation CPU as it will be labeled.
Usually, the latest BIOS update is already pre-installed but sometimes you might need to use an older CPU to get the BIOS to the latest, compatible version.
Although uncommon, if that does end up being the case, sometimes you’ll be able to get a loaner CPU to get the BIOS update done then you can send back the CPU.
For example, AMD does this with their Short-Term Processor Loan Boot-Kit – it’s free to do if you are lined up with the conditions they have set to send you the loaner CPU.
Some retailers may also offer to do something similar, just have to look into it if you end up needing it done.
Chipset Features & Future Compatibility
You should consider the features offered by different chipsets. From types and how many USB slots to other general features, it’s all determined by the chipset.
If you need specific capabilities such as overclocking support, multiple PCIe lanes, or advanced storage options, choose a motherboard with the chipset that offers those features.
You also need to consider choosing a motherboard with a chipset that provides room for future upgrades. This ensures that your system can accommodate newer CPU generations without requiring a complete motherboard replacement.

Understanding CPU socket type compatibility and motherboard chipset features is vital for a successful PC build. Not just because it’s required for the PC to function, but it’s also super nice to have a motherboard that is compatible with a nice CPU upgrade in the future.
Always refer to the motherboard’s specifications and documentation to verify compatibility before making a purchase.
You can also use different tools such as PC Part Picker if you want further guidance on compatibility with multiple parts, but do keep in mind that the site is not always 100% accurate – so always double-check when using a tool like PC Part Picker.
It’s better to use that tool for PC case specifications and whether or not you have enough clearance for specific RAM or coolers that you’re going to use for your build rather than for motherboard compatibility when you can figure out the compatibility based on the socket, chipset, and what BIOS update the board has.
Form Factors: Sizing Up Your Options
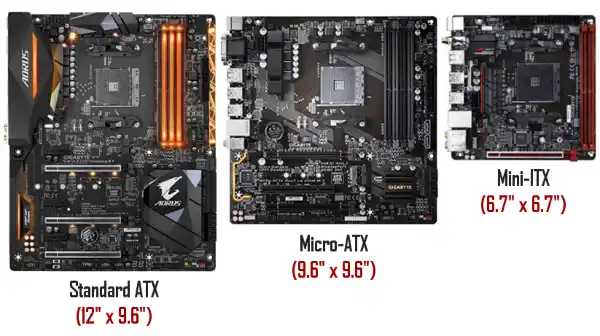
There are multiple form factors for motherboards, but the main three sizes used with almost any PC build are ATX, Micro-ATX (mATX), and mini-ITX.
You’ll need to ensure that whichever form factor you plan on using for your build is going to be able to fit with whichever case you end up using as well.
For the most part, most mid-tower cases that you’d likely be using for your build are going to be able to fit ATX and mATX motherboards.
Mini-ITX is only for those of you who are interested in building mini PCs – either to maximize the portability of your PC or if you simply want a small form factor rig, whether that’s for gaming or set up as an HTPC – it’s up to you!
Let’s dive into the main differences between the different form factors and how they also affect your choice for your PC case.
ATX
ATX motherboards are full-size and allow for the most expansion options for your build.
More PCIe slots, extra fan headers, more USB slots, and easier to work with – ATX is the standard form factor used with most PC builds and provides the most features for expanding your build.
With extra PCIe slots, you’ll be able to throw in a network card, a dedicated sound card, fan speed controllers, and USB header extensions – you have more room to work with and to add extra features to your board with the extra size.
ATX is about 25% bigger than mATX boards to allow for all of the extra expansion capabilities. Although smaller form factor boards do include having four total RAM slots, ATX boards will always have all four slots available.
Micro-ATX (mATX)
If you don’t plan on expanding your PC build with other cards or headers, then you’ll be able to save money by going with a mATX motherboard.

I find that mATX is harder to build with since everything is more cramped on the motherboard to optimize the smaller physical dimensions of mATX – but it can also be more helpful, especially when it comes to plugging in the front panel headers.
It makes sense to go with a mATX board if you do not need future expansions with PCIe, want to save the most money possible, or simply have a smaller form factor case that is only compatible with mATX boards.
Almost any true budget PC build is going to use mATX and they work perfectly fine – you only miss out on extra expansions and having a bigger board area to work with as you’re putting your PC build together.
Mini-ITX
Mini-ITX motherboards are only compatible with mini-ITX PC cases. Although ATX mid-tower cases can be used with both ATX and mATX, mini-ITX only has one compatible size when it comes to the PC case.
Mini-ITX builds are best for portability, being able to fit a lot of power in a smaller area, or simply for building a side PC for side uses such as HTPC or server capabilities – mini PCs are built with mini-ITX.
If you don’t need to have a PC that can fit in smaller spaces or don’t plan on moving your PC around all the time then I wouldn’t recommend going to a mini build unless you just want a small PC for the sake of having a mini PC or if you like the aesthetic of a specific mini-ITX case.
Mini-ITX can be a bit more expensive than mATX and you get even fewer options for your build – not to mention the much smaller work area to build with.
Things get pretty tight with mini-ITX builds, it can be tricky to get everything lined up and plugged in correctly with the mini-form factor.
Again, mini-ITX is great for smaller spaces and needing to fit a powerful rig in a small package or if you need to constantly move the PC around for portability then mini-ITX is the way to go.
If you don’t need a mini PC for those purposes, then there is no reason to go for this form factor.
Case Size and Motherboard Layout
ATX mid-tower cases are the most popular choice when it comes to wanting to save money on a good case and being able to fit both ATX and mATX form factors.
Some cases are designed only for mATX boards, whereas any case that is compatible with an ATX motherboard is also going to be compatible with any mATX motherboard. This even goes for full-tower cases, you’d still be able to put a mATX board into a full-tower if you wanted/needed to for whatever reason.
Mini-ITX PCs specifically use a mini-ITX motherboard with a mini-ITX PC case – it’s redundant to use a mini-ITX motherboard with any other case size.
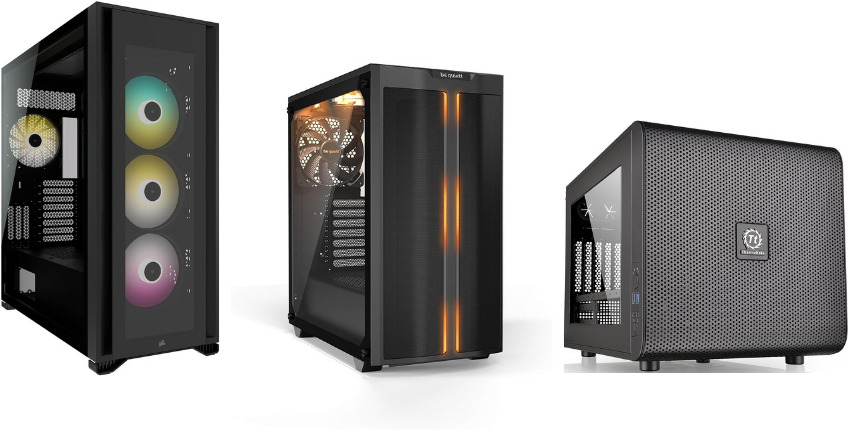
Like using mATX with a full-tower, most cases will be able to do it but there is no reason to go for mini-ITX if you’re using a mATX or ATX mid-tower case.
Every case manufacturer follows the same options for mounting your motherboard to your case. When you’re choosing a motherboard and a compatible case, you can simply go off of what the case manufacturer says is compatible when it comes to the different motherboard sizes.
That’s when you can complement your motherboard choice with your case choice to ensure that it’s easy to reach the different extra drive bays, how well you’ll be able to manage your cables from your board, etc.
Case choice mostly comes down to your preferences and what you want out of a case. When it comes to compatibility, most cases can be used with each type of motherboard form factor
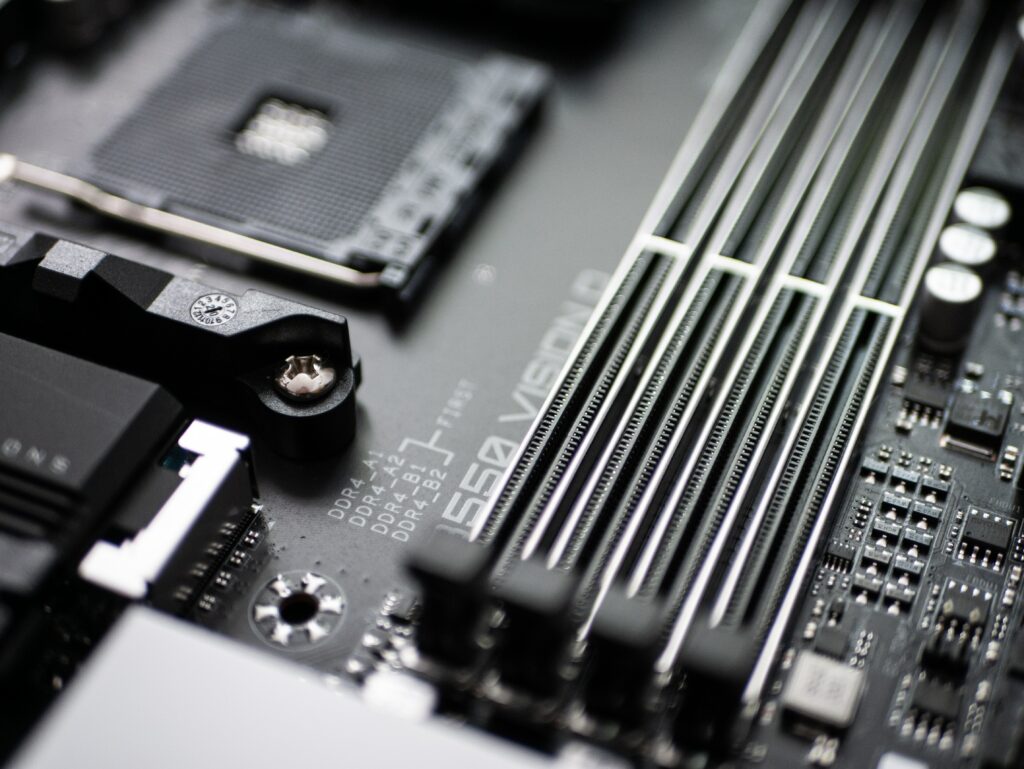
Expansion Capabilities & RAM
Whether it’s for adding wireless network capabilities, Bluetooth, sound cards, riser cables, or extra USB slots – that’s where having extra PCIe slot options comes into play.
Different motherboards also offer different amounts of SATA slots for extra hard drives or solid-state drives for storage.
You also have to factor in the motherboard’s RAM slots, what type of RAM is compatible with the motherboard, and what the maximum supported memory is for the motherboard.
Avoid making mistakes such as not having enough expansion for the future of your build and not optimizing your maximum memory limit/speeds by going through the following assessments – it’s better to fully understand everything that comes with your board rather than speedrunning and buying the first board that you think is best.
PCIe Slots For Expansion
The ability to expand your system in the future is a consideration that shouldn’t be overlooked. Some motherboards will come with network capabilities built-in which is the most sought-after addition for any build – both Wifi and Bluetooth – you’ll otherwise need to add a network card to have wireless capabilities with your PC.
You’ll need to ask yourself if you’ll ever want to expand your PC with different cards and whether or not your motherboard is compatible with those cards using PCIe x1, x4, x8, or the x16 slot.
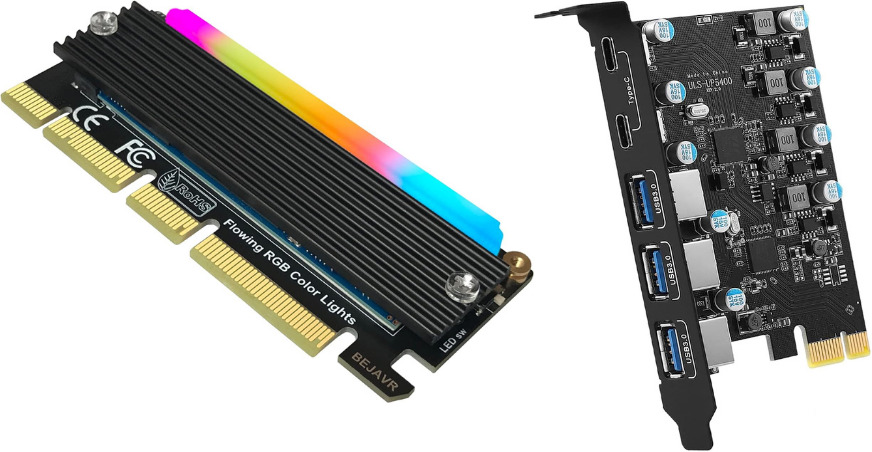
mATX boards can and usually do have an x4 slot which is compatible with many different network cards or SSD to PCIe converters on the market – you just need to be on the lookout and know whether or not you’re planning on wanting to add any extra cards for the different expansions slots available on the motherboard.
You can add more USB slots to your PC with PCIe header ports, SSD expansions through PCIe, GPU mount brackets, Gigabit Ethernet ports, etc through these PCIe slots.
Most builds don’t need a ton of extras so if you know you don’t need those extra cards for your build then you can save money by going with mATX and fewer PCIe slots.
Importance of RAM Slots
RAM affects how well your PC can handle multi-tasking – using multiple programs at the same time and it also affects game performance if you’re going crazy with a bunch of mods installed on a game such as Starfield or Minecraft.
Understanding your motherboard’s RAM slots and maximum supported memory is crucial – many builders make the mistake of adding extremely fast RAM just to find out that their board isn’t compatible with that speed.
Some CPUs do better with specific RAM speeds, while others thrive off of faster RAM speeds in general.

Intel’s LGA 1700 socket can use DDR4 or DDR5 RAM depending on the motherboard used, whereas the upcoming LGA 1851 socket will only be able to use DDR5. Same goes on the AMD side, with the AM4 socket using DDR4 and the newest AM5 socket using DDR5.
It has been high time for another jump in PC RAM and DDR5 is the latest for RAM, so we’ll be seeing most newer boards sticking with DDR5 for a long while. The switch from DDR3 to DDR4 was about seven years apart, and DDR4 was released in 2014…
Be sure to look into the details of whichever CPU you’re using and what type of RAM is not just compatible but most efficient with your CPU. DDR5 for the newest boards, DDR4 for anything else before AM5/LGA 1851 (except for some LGA 1700 boards).
Conclusion
This marks the end of the PC build motherboard guide!
All in all, choosing the right motherboard goes beyond just picking any motherboard that’s compatible with the CPU that you want to use for your build.
The chipset you decide to go with indicates the possibilities of future expansion that you want to include with your build – whether that’s for storage, further networking capabilities, or more USB slots… It’s something to consider when you’re looking for the right board.
If you don’t need any extra features then it’s probably best to go with a budget Micro-ATX option to save money to go towards further performance for your CPU and/or GPU.
There are a lot of different brands when it comes to motherboards and there are plenty of resources to scan through for help – Hopefully, this guide helped shed some light on what to look for with any motherboard and to make the smart choice for the future of your build!
If you’d like extra pointers as you’re moving along with your build’s motherboard choice then feel free to hit me up in the comments below – I’m more than happy to help and share my thoughts on whichever motherboard/CPU combo you’ve got your eyes on! 👍
So, which type of motherboard are you thinking of getting for your build?
Are you upgrading your build for a newer generation of CPU performance?
Is there anything else you aren’t sure of when it comes to finding the ideal motherboard for your build?
Let me know in the comments below! 😀
Hey there! 👋 I’m Colton, founder of PC Builds On A Budget.
Whether you need help putting your PC together, finding a great pre-built rig, or want some help finding awesome peripherals – I’ve got you covered!
I share my experiences of anything and everything related to gaming PCs with you here. 👍
Great article! I have a question about compatibility. If I choose a motherboard with an AM4 socket, will it support both older and newer Ryzen processors? Also, how do I ensure that the BIOS is up to date for the latest CPUs? Thanks for any insights on this, as I’m planning to upgrade my CPU soon and want to make sure everything works smoothly.
Hey Corey,
It was super recent at CES last week that AMD announced the Ryzen 7 5700X3D, Ryzen 7 5700, Ryzen 5 5600GT, and Ryzen 5 5500GT CPUs for the AM4 platform – they’re providing a lot of room on the AM4 platform, so it’s not going to be the kind of CPU upgrade that becomes irrelevant going forward with new CPUs and needing a different socket. AM4 will still last a very long time for high-end performance, so it’s still a good platform to go with – especially if you’re trying to save the most money possible with your build.
If you’re doing a build with a lower-end AM4 board and CPU, you’ll be able to have a solid upgrade path for the future that will stand the test of time.
AM5 is not going to be compatible with the AM4 socket CPUs, as it’s a different socket designed for the latest generation of Ryzen CPUs. If you’re doing a new build and have the budget for it, I’d recommend going with the AM5 socket since it’s the newest socket and will support a lot of future Ryzen CPUs.
As far as BIOS updates go, practically every motherboard will have the latest BIOS update right out of the gate – especially if you’re buying a brand-new motherboard from a retailer.
At times, you might need to use an older CPU to get the proper BIOS update, but that’ll depend on whether or not the motherboard manufacturer has the latest BIOS update with the board that they ship to you.
If you’re looking into building a new PC, every build guide shared here ensures that the motherboard is compatible with the CPU with brand-new parts right from the get-go – so if you are looking for a part list where you don’t have to worry about any BIOS updates to get your PC to boot up, be sure to check them out!
On the off chance that the motherboard doesn’t have the latest update, AMD has a CPU loaner program that I’ve linked within the article here where AMD will provide a loaner CPU so that you can get the BIOS to the latest update.
Happy to hear that this guide helped you out! Let me know if you have any other questions as you’re moving forward with your build! 👍